Performance Roofing, Co

Roof Replacement and Installation

Residential – Commercial – Multi-Family

Roof installation and Replacement Process:

Here at Performance Roofing, we are an open book and like to be straightforward about our roof installation process. As you read below, you will learn about our step-by-step approach to ensure your new roof meets the highest standards. We also take you through the specifics of each item so you can be fully educated when you move forward. This will ensure long term performance and protection for your home. The process below is for an asphalt shingle roofing system, but we work on all roofing systems including: Asphalt, Metal, Tile, Flat roof, Mod Bit, TPO, and more. Our roofing office is located in Pflugerville, and the roofing team is spread across the Austin Metro in each county we serve: Travis, Williamson, Bell, Bastrop, Hays, Burnet, and Comal.

Step 1: Removal of existing roofing system

When we replace a roofing system, we remove all of the existing roofing material down to the roof deck, and replace any/all damaged/rotten decking. This ensures a solid foundation for your new roofing system.

Step 2: Installation of Underlayment and Protection

Once all decking repairs have been completed we will install synthetic underlayment over the top of the decking to provide an additional layer of protection against water intrusion. We then install ice and water shield in all valley of the roof, perimeter of the chimney, base of pipe jack, and exhaust vent flashing. 

Next we install starter strip around the full perimeter of the roof to enhance the wind resistance for the bottom row of shingles against streamline winds, and we also install new drip edge flashing around the full perimeter of the roof line to help prevent water rotting the fascia trim boards.

Local Roof Replacement and Installation Service

Step 3: Shingle Installation, Vents, and Pipe Jacks

After the synthetic underlayment, ice & water shield, starter strip and drip edge flashing is installed, we install the new shingles, vents, and pipe jack flashings as we work our way up the roof. Once all of the shingles are installed we will install new hip/ridge caps, then all pipe jack flashing’s & exhaust vents will be caulked and painted to match the shingle color. 

Step 4: Finishing Touches of Roofing System

When the roof replacement has been completed we will clean all of the project related debris and use a magnet to pick up nails in the yard/driveway. Our roof installs are backed by a Lifetime Workmanship Warranty, and we provide the homeowner with a manufactures warranty for the roof we installed. Our team completes a final walk of your entire property to make sure you are completely satisfied, and provide you with your documentation.

Line item Step by Step Roof Replacement and Installation Process

  1. Remove existing hip/ridge caps
  2. Remove existing shingles
  3. Remove existing exhaust vents
  4. Remove existing pipe jack flashing’s
  5. Remove existing drip edge flashing
  6. Remove existing valley lining
  7. Remove existing underlayment (all layers)
  8. Replace rotten decking
  9. Install new underlayment
  10. Install new drip edge flashing
  11. Install new valley lining
  12. Install new starter strip
  13. Install new shingles
  14. Install new pipe jack flashing’s
  15. Install new roof exhaust vents
  16. InstaII new nip/ridge caps
  17. Paint roof vents to match shingle color
  18. Caulk & seal roof vent flashing’s
  19. Clean up & haul away job related debris.
  20. Final walk of the property

Here are the must do’s that our crews and project managers complete before, during, and after for your roof replacement and installation 

  • We verify material TYPE/ COLOR /QUANTITY upon arrival
  • Our team asks the homeowner prior to clear the driveway for us to place the dumpster and leave an area to place the material
  • Put Tarps around the full perimeter, over swimming pools, and HVAC unit.
  • Drop materials from roof directly into trailer upon removal
  • We us a magnet to pick up all the loose nails in your yard and driveway
  • Final Walk – We inspect the roof for quality assurance and your peace of mind that it was installed correctly
  • Pickup all leftover materials from your property 
Here are the line item materials needed for a shingle roof install:
  • Underlayment

  • Valley lining

  • Starter strip

  • Drip edge flashing

  • Shingles

  • Hip/Ridge caps

  • Pipe jack flashing

  • Roof exhaust vents

  • Dryer vent

  • Coil nails

  • Cap nails

  • Step flashing

  • “L” flashing

  • Caulk/Sealant

  • Spray paint

Want to know the specifics of each roof material? 

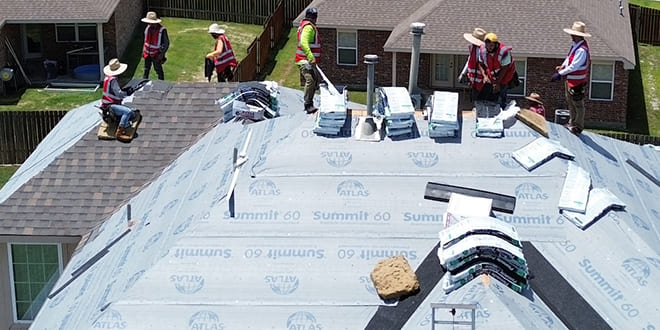
While we install all types of manufactures, the example below is for Atlas, our preferred asphalt shingle roofing system, and the other items that go into your system. 

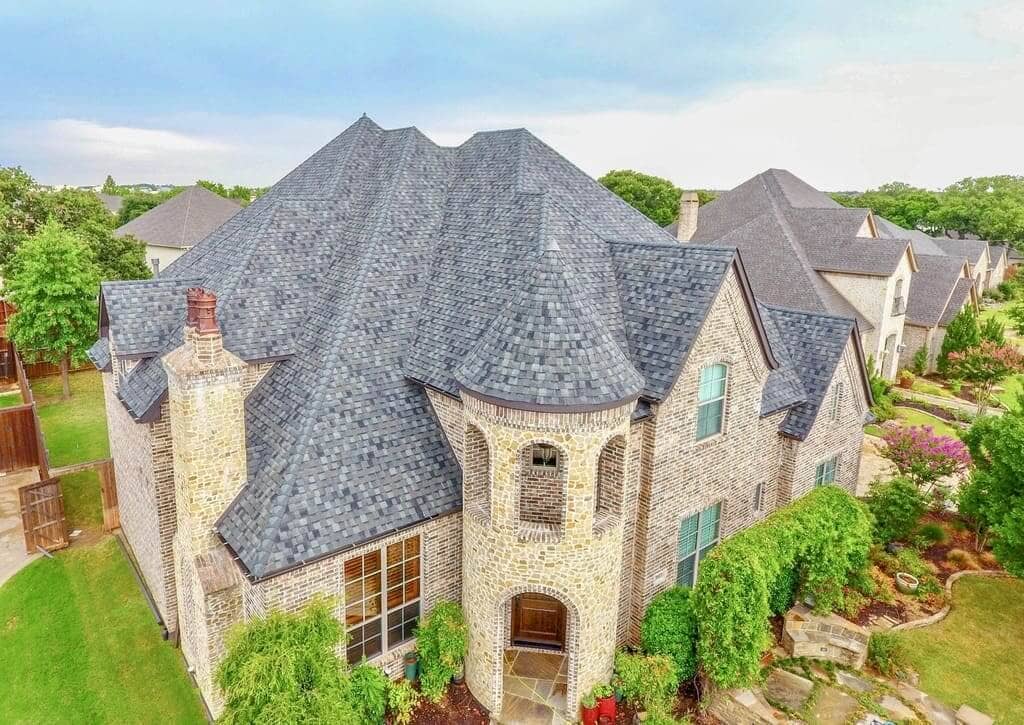
ROOF MATERIALS WE USE:

Synthetic Underlayment:

  • Atlas Summit 60
  • Install over entire roof surface
  • Installed using 1″ plastic cap nails
  • 10 squares per roll

Rather than installing 15 or 30 # felt, we install synthetic underlayment which provides enhanced protection against water and mold growth, and is made with a woven polymeric scrim which reduces slippage between underlayment and roof decking, and is safer for the crew to walk on during installation. Synthetic underlayment can keep the roof water tight without shingles on top for up to 60 days.
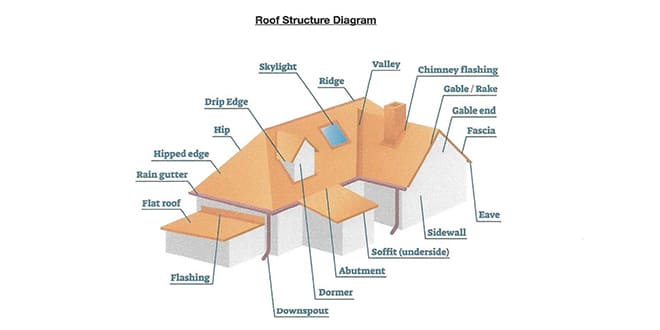
Ice & Water Shield:

  • Atlas WeatherMaster Ice & Water 200
  • Install in all valley’s, base of roof flashing, and perimeter of chimney.
  • Self adhering installation
  • 66 LF per roll

Rather than installing metal in the valley of the roof we install ice and water shield. When you drive a nail through metal there is a small gap around the nail head where water can enter, but ice and water shield is a rubberized membrane which creates a watertight barrier by sealing around the nails when punctured. This provides a secondary waterproofing barrier in leak prone areas to prevent ice dams and damage from wind blown rain.

STARTER STRIP:

Atlas Pro-Cut Starter Strip

  • Installed around the full perimeter of roof line after underlayment, before shingles.
  • Installed using 1.25″ galvanized roofing coil nails and 140 LF per bundle.

Rather than flipping a 3-tab shingle upside down, we install a true starter strip which has an extra layer of adhesive known as the “seal down strip” which enhances wind resistance for bottom roof of shingles to prevent shingles from lifting up during high winds.

Shingles:

  • Atlas Pinnacle Pristine High Performance Architectural Shingles
  • Install in field of roof surface with pitch 3/12 or higher
  • Installed using 1.25″ galvanized roofing coil nails.
  • 3 bundles per square

Rather than installing 3-tab shingles which have 60 mph wind resistance and a 25-year manufacture warranty, we install Atlas Pinnacle Pristine architectural shingles which have 130 mph wind resistance and a 50-year manufacturer’s warranty. 3M Scotchgard produces copper granules for the Pinnacle Pristine shingles and the granules on the shingles are comprised of approximately 12% copper which keeps the roof algae free for the lifetime of the shingle. Atlas is one of 2 manufactures that can provide lifetime algae resistance warranty (other is Malarkey.) Atlas has an industry leading 50 year non-prorated manufacture warranty, and only requires 4 nails per shingle for 130 mph wind resistance (competitors require 6 – Atlas has less penetrations back through the roof deck and less chance of leaks.) Nail strip is 1.5″ which provides installers enough space to hit nail strip each time to achieve intended wind resistance.

Hip & Ridge Cap:

  • Atlas Pro Cut Hi Profile Hip & Ridge Shingles
  • Install on all hips/ridges on roof line
  • Installed using 1.25″ galvanized roofing coil nails.
  • 20 LF per box

Rather than cutting 3-tab shingles and using them for hip/ridge, we install hi-profile hip/ridge caps which are thicker, have a higher wind resistance and provide a designer appearance. 3-tab hip/ridge caps only have 60 mph wind resistance and a 25 year warranty period, while hi-profile hip/ridge caps are 130 mph wind resistant and are covered by the Atlas 50-year Lifetime Manufacturer’s Warranty.

Drip Edge Flashing:

  • 1.5″ x 1.5″ galvanized metal drip edge (standard)
  • Install around full perimeter of the roof line (eaves & rakes)
  • Install using 1″ cap nails
  • 10 LF per piece

We install drip edge flashing around the full perimeter of the roof line to prevent water trickling off of the shingle, and being absorbed by the wood fascia trim. Drip edge is metal flashing bent at a 90 degree angle that gets installed on all eaves/rakes of the roof line by a cap nail on the top side of the flashing that sits flush on top of the roof decking. The front side of the flashing should sit flush on the front of the fascia board. We also install drip edge with a pre-baked paint finish that matches the color of the shingles.

Pipe Jack Flashings:

  • Galvanized Steel 3N1 Pipe Flashing
  • Install on plumbing exhaust vents (pipe jacks)
  • Install using 1.25″ galvanized roofing coil nails

Rather than using plastic pipe jack flashing’s that crack due to high heat in Texas, or lead pipe jack flashing’s that squirrels chew on (create hole), we use 3N1 pipe jack flashing’s that have a galvanized steel base, and an elastomeric collar. Once the flashings are installed we caulk/seal the nails and paint them to match the shingle color for aesthetics.

Roof Exhaust Vents:

The purpose of roof exhaust vents is to allow hot air to escape the attic. A cool/properly ventilated attic space will help the shingles last longer, and will reduce the amount of energy needed to keep the inside of the home a cool/comfortable temperature. A improperly ventilated attic space will reduce the life of the shingles and will require more energy to keep the inside of the home cool/comfortable. When the attic is under-ventilated it is like an oven – the high temperature in the attic causes the asphalt on the shingles to bubble, and eventually the bubble will burst and leave a small hole in the shingle (blistering) which can allow water to enter the attic/home. Regardless of which type of vent you install, the attic exhaust and intake need to be matched for proper ventilation. In order to match the intake/exhaust you should use a vent calculator to verify how many intake/exhaust vents are needed (GAF’s website has a great/free attic vent calculator you can use to match the intake/exhaust for different types of vents.)

Types of Vents:

Active vents are vents that use a motor, fan blade, or a turbine to move air in the attic.

They are similar to fans the blades spin and the air in the attic is sucked up and exhausted through the roof by the vent. Types of active vents listed below.

* Power vents (motor powered and connected to electricity in the attic.)

* Solar vents (motor powered and runs off of solar energy)

* Turbine vents (wind powered – without wind this is a passive vent.)

Passive Vents are vents that have no motor, fan blade of turbine, and strictly rely on air coming into the intake vents then rising and escaping through the exhaust holes on the vents. Types of passive vents listed below:

* Slant back vents (hot air rises and escapes through holes on the -1 ‘x1’ square vent.)

* Ridge vent (hot air rises and escapes through small holes on plastic vents placed along the ridge – must cut decking along the ridge 4″ wide to allow hot air to reach the vent.)

* Gable end vents (air from outside enters through a wood/metal hole at the front/back of the attic space – air enters one side of the attic, and leaves through the vent on the opposite side of the attic.

Dryer Vents

  • A roof dryer vent is a type of venting system that is designed to exhaust hot air and moisture from a clothes dryer through the roof of a building. It typically consists of a metal pipe or duct that runs from the dryer through the attic and out through the roof. The dryer vent you install on a roof creates a path for the hot, moist air from the dryer to escape outside the building. This helps to prevent a buildup of excess humidity and heat, which can cause problems such as mold growth, and fire hazards.
  • We use galvanized steel gooseneck dryer vents.

Coil Nails:

  • 1 box/15 SQ.
  • Electro-galvanized coil nails are the nails we use to install the shingles and secure the roof flashing to the roof decking. We make sure to use galvanized nails that resist rust/weathering. Atlas specifies that installers use 1-1 /4″ nails in order to achieve the 130 mph wind resistance and in order to receive a manufactures warranty from them.
  • Our team makes sure to advise any clients with exposed soffit that the 1-1/4″ nails will penetrate the exposed roof decking and they will see the nails poking through. We can use smaller nails where the soffit is exposed, BUT it will VOID the manufacturer’s warranty and reduce the wind rating.

Cap Nails:

  • 1 box/20 SQ.
  • Electro-galvanized ring shank cap nails are the nails we use to secure the synthetic underlayment to the roof decking. These nails are 1″ long, and have a plastic cap around the nail head to help prevent leaks. Make sure to get the “ring shank” (ribbed) nails so the nails grip into the wood decking better.

Step Flashing:

  • Step flashing is a rectangular piece of galvanized steel flashing bent 90 degrees in the center. It is used for roof to wall flashing. Multiple pieces of the flashing will be installed in layers with shingles to ensure the water flows away from the wall. It’s installed in steps, with layers of shingles between, so that the water pours down each step and down the roof
  • Installed against the wall/chimney on a downward slope.

Base Flashing:

  • Base flashing is a piece of galvanized metal bent 90 degrees and installed at the bottom of a wall/chimney on the downward slope where the wall meets the roof material.

Counter Flashing:

  • Counter flashing is a piece of galvanized metal that gets installed against a wall and overlaps the top side of the base flashing in order to keep water from getting behind the base flashing where the flashing meets the wall.

Our team at Performance Roofing in Pflugerville  understands that there are a lot of items, so here is a simple roof diagram to make it easier for you to visualize.

Roof Replacement Service

Our team is on call 24/7 and ready to setup your appointment

SERVICE AREAS

Total Company Reviews Across 3 Locations